Showing posts with label cheap. Show all posts
Friday, April 29, 2011
Mother's Day Floral Topiary: Easy, Beginner's Project, No-Sew
While browsing floral arrangements online, I saw a beautiful topiary arrangement. The price was less beautiful, as the flowers were fresh. It was, however, something I'd love to give my own mother and grandmother this Mother's Day.
Just between you and me, I got my supplies at the Dollar Store. It's not that I have anything against spending more on a gift... but why, when you can get great quality items for less?
You Will Need:
A Flower Pot
Styrofoam that will fit in said pot
A Styrofoam Ball
Decorative Twigs
Various Silk Flowers (at least 2 bunches for the top ball, and 2 bunches for the pot)
Dried Moss
Wire Cutters
Ribbon (optional)
***The Size of the flower pot and the foam ball are entirely up to you. For your reference, my pot is 4.75 inches tall, and the foam ball is 4 inches in diameter. The finished product is 16.5 inches tall.***
1.) Place your foam in the pot, and a stick (I used a bamboo skewer (like for kabobs) on mine but you can easily use one of the twigs) in the center for the foam ball.
2.) Use a pencil to mark where the bottom of the ball is. Remove the ball and then cut twigs to surround the skewer, using your mark as reference for length. Stick them into the foam and replace the ball.
3.) Use the moss to cover the foam in the pot.
4.) To make short flower pieces, first take the flowers and greens off of the wire stems.
Then cut the wire stem into short pieces.
Place the individual flowers onto the short wire pieces.
5.) Poke these flower pieces into the pot-foam (through the moss) until you like the fullness.
6.) Using the same process for making individual flower pieces, poke flowers into the ball- alternate with the greens- until you like the fullness.
7.) Dab some hot glue at the base of your twigs and apply the end of your ribbon. Wind the ribbon around the twigs and glue in place at the top. (If you don't want to use ribbon, you can gather your twigs together at the top with a rubber band. Just make sure to cover it with the flowers and greens)
You're finished!
How easy was that!? I made these myself and I'm still looking at them thinking (a' la Stacy on What Not to Wear), "Shut-up!"
These came to about $8 each, but you will have twigs, moss, wire stem, and greens left over.
Friday, January 21, 2011
Make Your Own Sackboy Doll/Plushie
If you don't happen to have a sewing machine, this is a small project that would be very easily done by hand.
You Will Need:
- Brown Knitted Fabric
- Black Fabric
- Red Fabric
- Stuffing
- Black Buttons
- A Zipper
First you will need to cut your body pieces. It's important to cut the grain or lines of the knit in the way indicated due to streatching.
| I will be using a brown scarf bought at the dollar store. |
Pieces:
Head A- 3in x 6in cut with the knit lines going the 3in length
Head B- 2in x 6in cut with the knit lines going the 2in length
Circle- 3in (I used a child's drinking cup for this)
Body- 3.5in x 3.5in
Legs and Arms- 3in x 3.5in cut with the knit lines going the 3.5in length
Putting it Together
1.) The head consists of the two pieces, joined around the mouth. To make the mouth, I cut a piece from the cardboard tag (cereal box cardboard would work as well)...
I then used craft glue to attach them to black fabric (I used cotton, but any scrap you have would do)...
| I'm making two at a time, you only need one of these. |
...Cut around the cardboard at about 1/4in...
...Cut and glue a red tongue to the front (I used felt).
2.) Sew the mouth piece to 'Head A' by centering it and then starting from one mouth edge.
3.) Sew the mouth piece to 'Head B' in the same manner, then sew 'Head A' to 'Head B' at the mouth seam.
4.) Sew the Circle to 'Head A' leaving the ends un-sewn.
| I found it very easy to sew without the pins but this somewhat shows the placement. |
5.) Sew the body to 'Head B', matching the knit line direction.
| Again, easily sewn without the pins, just stretch the smaller body piece to fit the head piece. |
7.) Sew the back seam leaving the 'Head A' section open for stuffing, then flatten and sew to round off the bottom of the body.
| You can see the back seam is in the middle. |
6.)Stuff and hand stitch shut.
7.) Make the Legs and arms by sewing down one long (3.5in) edge and then sewing a rounded bottom edge.
8.) Stuff, then fold the open end in and hand-stitch shut.
9.) Sew the eye and limbs in place.
10) For the zipper, I just went to my stash and cut a 7in zipper down to size, whipstitched (stitched around and around in one place) the end, and hand stitched in place.
There's your Sackboy.
I would love to see what you have made! Please join in on the Link Party going on Monday, 1/24/11 through Tuesday, 1/25/11.
Labels:
cheap,
easy,
Kids Craft,
little big planet,
plushie,
sackboy,
stuffed,
toy
Thursday, January 20, 2011
Homemade Laundry Soap and Liquid Fabric Softener
I know. I was a little aghast that one could make their own laundry soap, too. But as that thought always does, it ended with a 'well why not'? Someone has to make the stuff that is on the store shelves. Not only that but pioneering women had to make their own soaps for centuries. So why not?
It's not the science experiment you might imagine it to be. You still use some store bought products, but the benefit is that it's much more economical...Less than $1.00 a GALLON! It also won't contain the heavy perfumes like commercial soaps (which frankly give me a headache). Unless, of course, you add them yourself.
The things we need for the Laundry Soap are found in the laundry aisle in my local super store chain, Meijer (but I haven't found Fels Naptha in Walmart). You may have to do some looking or ask an employee, though, as they aren't as commonly used as they once were. The ingredients for the Fabric Softener are common and can be bought at many Dollar stores.
Laundry Soap
You Will Need:
- Fels Naptha Bar-Less than $2
- Washing Soda (Not Baking Soda)-Around $3 for a large box
- Borax-Around $3 for a large box
- Containers enough to hold 2 Gallons
- A Large Pot , and Utensils: A Spoon, A Grater, and A Funnel not used for cooking
1.) Grate 1/3 of the bar of Fels Naptha and melt it in the pot with 6 Cups of water.
2.) Add 1/2 cup each of Washing Soda and Borax, stir until disolved.
3.) Add 1 Gallon + 10 cups of hot water and stir well. *I use a 5 gallon bucket to add the soap mixture to the water, but this is optional.*
4.) Pour into your containers (I use a cleaned out milk jug and a vinegar jug).
Use 1/2 cup of soap for a normal load of laundry.
You can use the soap right away, but it will set as more of a thin gel over night. You will want to periodically shake the containers to keep it from clumping. I do this by keeping them on top of the washing machine for a couple of days and letting the spin cycle shake it for me. I also give it a good shake before I pour it.
Liquid Fabric Softener
Liquid Fabric Softener is mixed right in the jug. For 1 jug simply mix: One 15 oz. Bottle of Hair Conditioner (the one pictured is 32 oz. and purchased at the dollar store), 3 Cups White Vinegar (no, your clothes won't smell vinegar-y), and 6 Cups Water.
Shake it up to mix, and use as you would with the store bought stuff.
P.S. There's an awesome giveaway from Fat Quarter Shop over at Adventures in Dressmaking... check it out!
Friday, December 17, 2010
Snow and Ice Votive Holders: Kid Friendly Christmas or Winter Craft
A few years ago we were hit with a horrible winter storm which left us without power through the Christmas break (fortunately we had heat and a cooking surface with our wood stove fireplace). It's amazing how much we all depend upon electricity to entertain us! So, with three little boys to keep busy at night (when it was too dark for them to play in their rooms), and a definite need for candles, we started crafting.
My older two made the punched-tin candle holders most of us made as children. For my youngest, we made a Snow and Ice Votive Holder. It's the perfect wintry looking decor item, very easy, and costs only pennies.
You Will Need:
1.) Collect your jar(s), wash, and remove any labels.
2.) Paint the school glue in an even and a little-more-than-thin coat on the outer surface of the jar.
3.) Sprinkle the table salt onto the glue.
Allow it to dry and you will have a snow covered candle holder...and a very proud child, too.
My older two made the punched-tin candle holders most of us made as children. For my youngest, we made a Snow and Ice Votive Holder. It's the perfect wintry looking decor item, very easy, and costs only pennies.
You Will Need:
- A small glass jar (I used bullion cube jars)
- White school glue... you know, the kind with a bull on the label.
- Table salt
1.) Collect your jar(s), wash, and remove any labels.
2.) Paint the school glue in an even and a little-more-than-thin coat on the outer surface of the jar.
| A 10 year old and a 4 year old getting in on the fun. |
3.) Sprinkle the table salt onto the glue.
Allow it to dry and you will have a snow covered candle holder...and a very proud child, too.
Tuesday, November 30, 2010
Make Your Own Charlie Brown-ish Christmas Tree
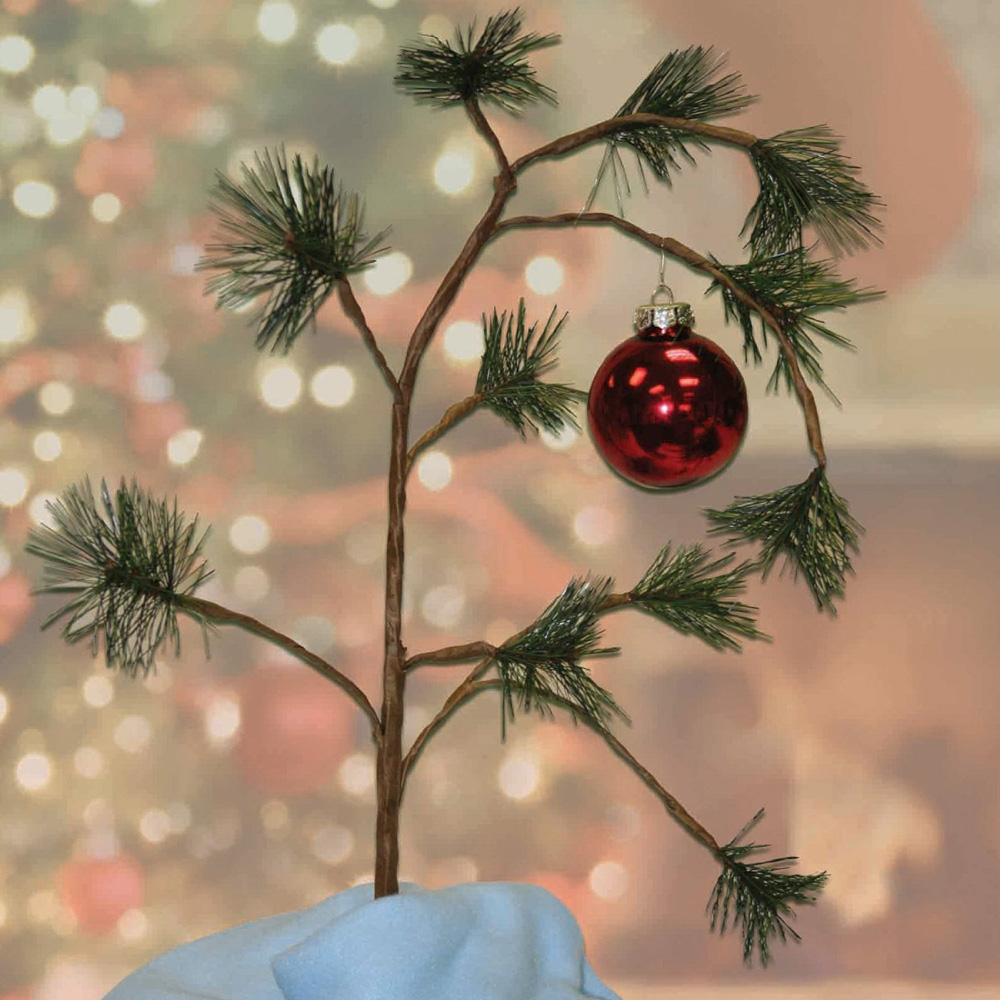
Oh how we love the Charlie Brown specials! My kids look forward to seeing them every holiday season and randomly quote them throughout the year. So when we saw a "Charlie Brown Christmas Tree" at the local stores, the boys wanted one of their very own.
So cute and pathetic, isn't it? On sale, I've seen it for around $12 but to tell you the truth I'm just cheap. I can't see spending that much on an 18 inch scraggly tree branch.
Fast forward to Black Friday... I was standing in line waiting for my turn at a great deal on electronics, when I see the tree on an endcap (these folks know they have a captive audience and use their marketing skills!). Why, it's nothing more than wrapped wire with a few pieces of faux evergreen. I can do that.
Here's what you'll need:
1.) Cut ten pieces of evergreen.
2.) Cut a length of wire for the main stem, 23 inches (18 inches for the tree, plus some for under the base).
3.) Twist the end of the wire around one piece of evergreen.
4.) Start wrapping the floral tape where the wire is twisted and wrap around going down the wire about 3 inches.
5.) Make the branches in the same way, with shorter pieces of wire. Wrap the floral tape down most of the length of the wire for the branches, then twist them onto the main stem. Here you can be as creative as you want to be. I looked at a picture of the store's tree for reference and made my branches accordingly.
Wrap the main stem with floral tape as you go.
6.) Make or prepare your base. For my wood base I cut one piece in half and stapled them onto the main piece. I then made a small hole in the center with a screw. Other options are using a clean coffee can with a hole in the lid, or turning a flower pot upside-down.
7.) Feed the main stem through the hole and secure as needed. On my wood base I stapled the wire down and cut off any excess.
8.) All that's left is to add the scrap of blue flannel for Linus' Blanket, and a red ornament.
Have fun!
So cute and pathetic, isn't it? On sale, I've seen it for around $12 but to tell you the truth I'm just cheap. I can't see spending that much on an 18 inch scraggly tree branch.
Fast forward to Black Friday... I was standing in line waiting for my turn at a great deal on electronics, when I see the tree on an endcap (these folks know they have a captive audience and use their marketing skills!). Why, it's nothing more than wrapped wire with a few pieces of faux evergreen. I can do that.
Here's what you'll need:
- Wire
- Floral tape
- A dollar store wreath, garland, or some source of the evergreen pieces
- Something for the base- I used wood scraps, you could also use an old coffee can, or a flower pot
- Piece of blue flannel
- Red ornament
- Wire Cutters
1.) Cut ten pieces of evergreen.
2.) Cut a length of wire for the main stem, 23 inches (18 inches for the tree, plus some for under the base).
3.) Twist the end of the wire around one piece of evergreen.
4.) Start wrapping the floral tape where the wire is twisted and wrap around going down the wire about 3 inches.
5.) Make the branches in the same way, with shorter pieces of wire. Wrap the floral tape down most of the length of the wire for the branches, then twist them onto the main stem. Here you can be as creative as you want to be. I looked at a picture of the store's tree for reference and made my branches accordingly.
Wrap the main stem with floral tape as you go.
6.) Make or prepare your base. For my wood base I cut one piece in half and stapled them onto the main piece. I then made a small hole in the center with a screw. Other options are using a clean coffee can with a hole in the lid, or turning a flower pot upside-down.
7.) Feed the main stem through the hole and secure as needed. On my wood base I stapled the wire down and cut off any excess.
8.) All that's left is to add the scrap of blue flannel for Linus' Blanket, and a red ornament.
Have fun!
Subscribe to:
Posts (Atom)