Showing posts with label Tutorial. Show all posts

Monday, November 8, 2010

Straight up Slippin', Boo! Using a Bed Sheet for a Slipcover

I'm so close to having my own creative space! The walls are up and painted a cheery yellow. Next we put in the drop ceiling and carpet. Woo hoo!

Something I will need after all the construction stuff is complete, is lovely furniture. I've already begun painting old cabinets...


... My project yesterday involved a cute little arm-chair. Just the thing for relaxing!


What? You don't think it's so cute? You don't see it working with cheery yellow walls?

Neither do I.

So I took myself over to Joann's and priced out the upholstery fabric for recovering (which happens to be 50% off this week).

Yeah...not gonna happen on my budget. I have expensive tastes.

Fortunately my quilting experience has taught me, a great way to get lots of fabric very cheaply is to buy a sheet. I got a full size set at a super store for right around $20, less than half of the price of the material at Joann's.

First thing I did was to take that horrible trim from the bottom.


Borrowing an idea from the now defunct Trading Spaces, I removed the cushion and draped the flat sheet over my chair and got to pinning.


1.) After draping the sheet (wrong-side up) over the chair, adjust (but not tuck) so that the bottom edge is even all the way around.

2.) Pin in the places where there is just too much fabric, corners, curves, etc. to fit the sheet to your chair's shape.  Spend a lot of time on this step. The more pins and time, the easier it will be to sew and the better it will look.

***For a No-Sew Slipcover, use a bunch of safety-pin to fit the sheet.***


3.) Gently pull the sheet off of the chair, turn right-side up and place back on the chair to check the fit. You will likely do this step at least twice, just remember the more time you spend here the better it will look.

*** No-Sew: after this step you're done! Just pull a pillow case over the seat cushion and you're good to go.***


4.) Once you have it just how you want it, cut the excess fabric  about half an inch away from the pins.

5.) Sew the, now cut, seams. (This is where I added a little trim)


6.) The seat cushion is as simple as making pillows. Measure the top square (or rectangle in my case) from side to side, and add an inch to each measurement. Cut two squares, that size. for the gusset (the strip that goes around the width) do the same, adding that inch to the width and length.

7.) Sew that all together, leaving the back open at one seam so you can slip the cushion in there.

8.) Finishing the edge for the cushion cover has a few options. You can hand stitch it closed, use hook and loop (like Velcro) pieces, or if you're lazy like me and out of velcro you can safety-pin it shut.

I can't wait to post some finished room pictures!

Wednesday, October 27, 2010

A Sweet Little Pin Cushion-No Sew

Today, I had a nagging pain in my neck and head. Today, I had dishes and laundry piled up. Today, the laundry just isn't getting done. Today, I needed a simple craft. Something quick and pretty, with almost instant gratification.Today...I stumbled upon the sweet little pin cushion tutorial from Creations By Kara. Perfect!

I gathered my supplies...

Tuna Can, and coordinating Fabrics


Cut a strip and a circle...


I gathered and stuffed...


I glued...


And glued some more, then embellished...


Ahhhhhhhhh. I have crafted. My laundry is still there, but I feel my day is complete.

Do me a favor and check out Kara's tutorial. She did a great job, and so will you!

Tuesday, October 26, 2010

Nifty-Gifty: A Quick Little Basket with Sew or No-Sew Instructions

This sweet little recycling piece is actually a project I did in Summer Camp around the age of ten (in a group of 9-12 yr olds), using hot glue guns instead of sewing machines. It makes use of an old plastic bottle and fabric scraps; it's a great fat quarter/scrap project;  AND it makes a perfect little gift basket for smaller items.

You Will Need:
  • A Plastic Bottle (2-Liter soda bottles work well)
  • Fabric
  • Trim
  • Glue Gun
  • Rubber band
  • Ribbon
  • Stuffing


1.)  Cut 2 circles from your fabric. I used a 13 inch pot-lid to trace them out, but I found it was just a little smaller than I wanted. I suggest a circle with a 15 inch diameter.


As you can see I chose 2 coordinating fabrics


2.) I find it easier to work with if I sew the trim to the right side of one circle...


3.) ...then sew the second circle to the first one (right-sides together), sandwiching the trim between the two pieces. Leave a few inches unsewn  and turn right-side out. (P.S. If you don't have a piping foot, a zipper foot is very helpful)


*************************************************************************************

No-Sew Instructions:

1.)Iron a quarter-inch fold, towards the back, around the edges of both circles.

2.) Hot glue the trim to the back (wrong side) of one circle

3.) Then glue the second circle wrong-sides together to the trim, leaving a portion of the edge open to stuff.

************************************************************************************

4.) Stuff lightly.


5.) Cut the bottom off of the soda bottle about 4 or 5 inches up. The bottom will be your basket.


6.) Cut a strip of fabric long enough to cover the circumference of the bottle, and 8 inches wide. Hot glue this piece to the outside of the bottle, then fold to the inside of the bottle and glue down.


7.) Place the bottle on the center of the stuffed circle.  Gather the circle upward and secure with the rubber band.


8.) Cover the rubber band with a ribbon.


9.) Fill with whatever goodies you like: flowers; candy; potpourri; tea and crackers; soup mix; etc. Wouldn't this be a great gift basket or craft/party favor?


I filled mine with the lovely Coffee Filter Flowers I made (yes, I said those flowers were MADE) from Aunt Peaches' Blog.

oneprettything

Monday, October 25, 2010

Making a Cowl Scarf-No Knitting Required

Cowl Scarves are everywhere this season. If you would like to add one (or more) to your wardrobe, inexpensively, look no further than your own closet. I will be using the leftovers from the long knit skirt in last Friday's blog. You, however, can use a sweater.

Here's the piece I had after cutting strips for the poncho


1.) I started by cutting the faux-pleat section from the waistband. If you are using a sweater, cut your strip double the width you want it to be when finished.
 
2.) I had to cut at one of the seams so that I had a long strip (otherwise I couldn't turn it right-side out). Then, just fold the right-sides together and sew the long edge. Turn right side out.


3.) Fold in the edge of one end, and stuff the other end inside of that. Stitch it shut.


You have now a cowl scarf. Wind it around your beautiful neck and accessorize with a just as beautiful pin.


Friday, October 22, 2010

Remake: Ruffled Poncho

It's that time of year in the North-Midwest. There's frost on the grass in the morning, Apple Cider is a grocery staple, and cozying up in your favorite blanket with a mug of coffee/cocoa/tea is a luxury we all indulge in.

Wouldn't we love it if we could stay wrapped up in our blankets all day? But that would make it a shawl or poncho... well there's an idea! And that's where my two yard sale finds com in.


A chenille yarn throw and a full length knit skirt. Fifty cents each!

As you can see, the blanket is a little worn. The tag on it says "Dry Clean Only", and the easiest way to take care of that is to cut the tag off. Really, I'm not going to dry clean it. I just pop it in the wash to get any shrinking done and over with.

**Note to self: chenille yarn doesn't shrink...it fuzzed out all over the washing machine**

1.)So with everything washed and dried, I trim off the scraggly ends.


2.) Fold the blanket into fourths, and cut a shallow neck hole. You may want to use a shirt as a guide. (Remember: Start small!)


3.) Unfold once (so it's only folded in half: short ends together at the bottom), cut down the center from neck to bottom edge.


4.) Cut strips from the skirt. I cut four strips about 4 inches wide and then sewed three pieces together to make a long ruffle around the neck and down the front, with one piece to trim the bottom edges. Of course how many you need to cut etc. will all depend upon your available materials.


5.) Pin and stitch the trim in place.


6.) Wear! The edges are a little rough yet, I might make my own bias tape and sew that on later.


I just noticed the strings hanging down. LOL I missed those ones but since it's all stitched, it's easily taken care of with a quick snip.


Thursday, October 21, 2010

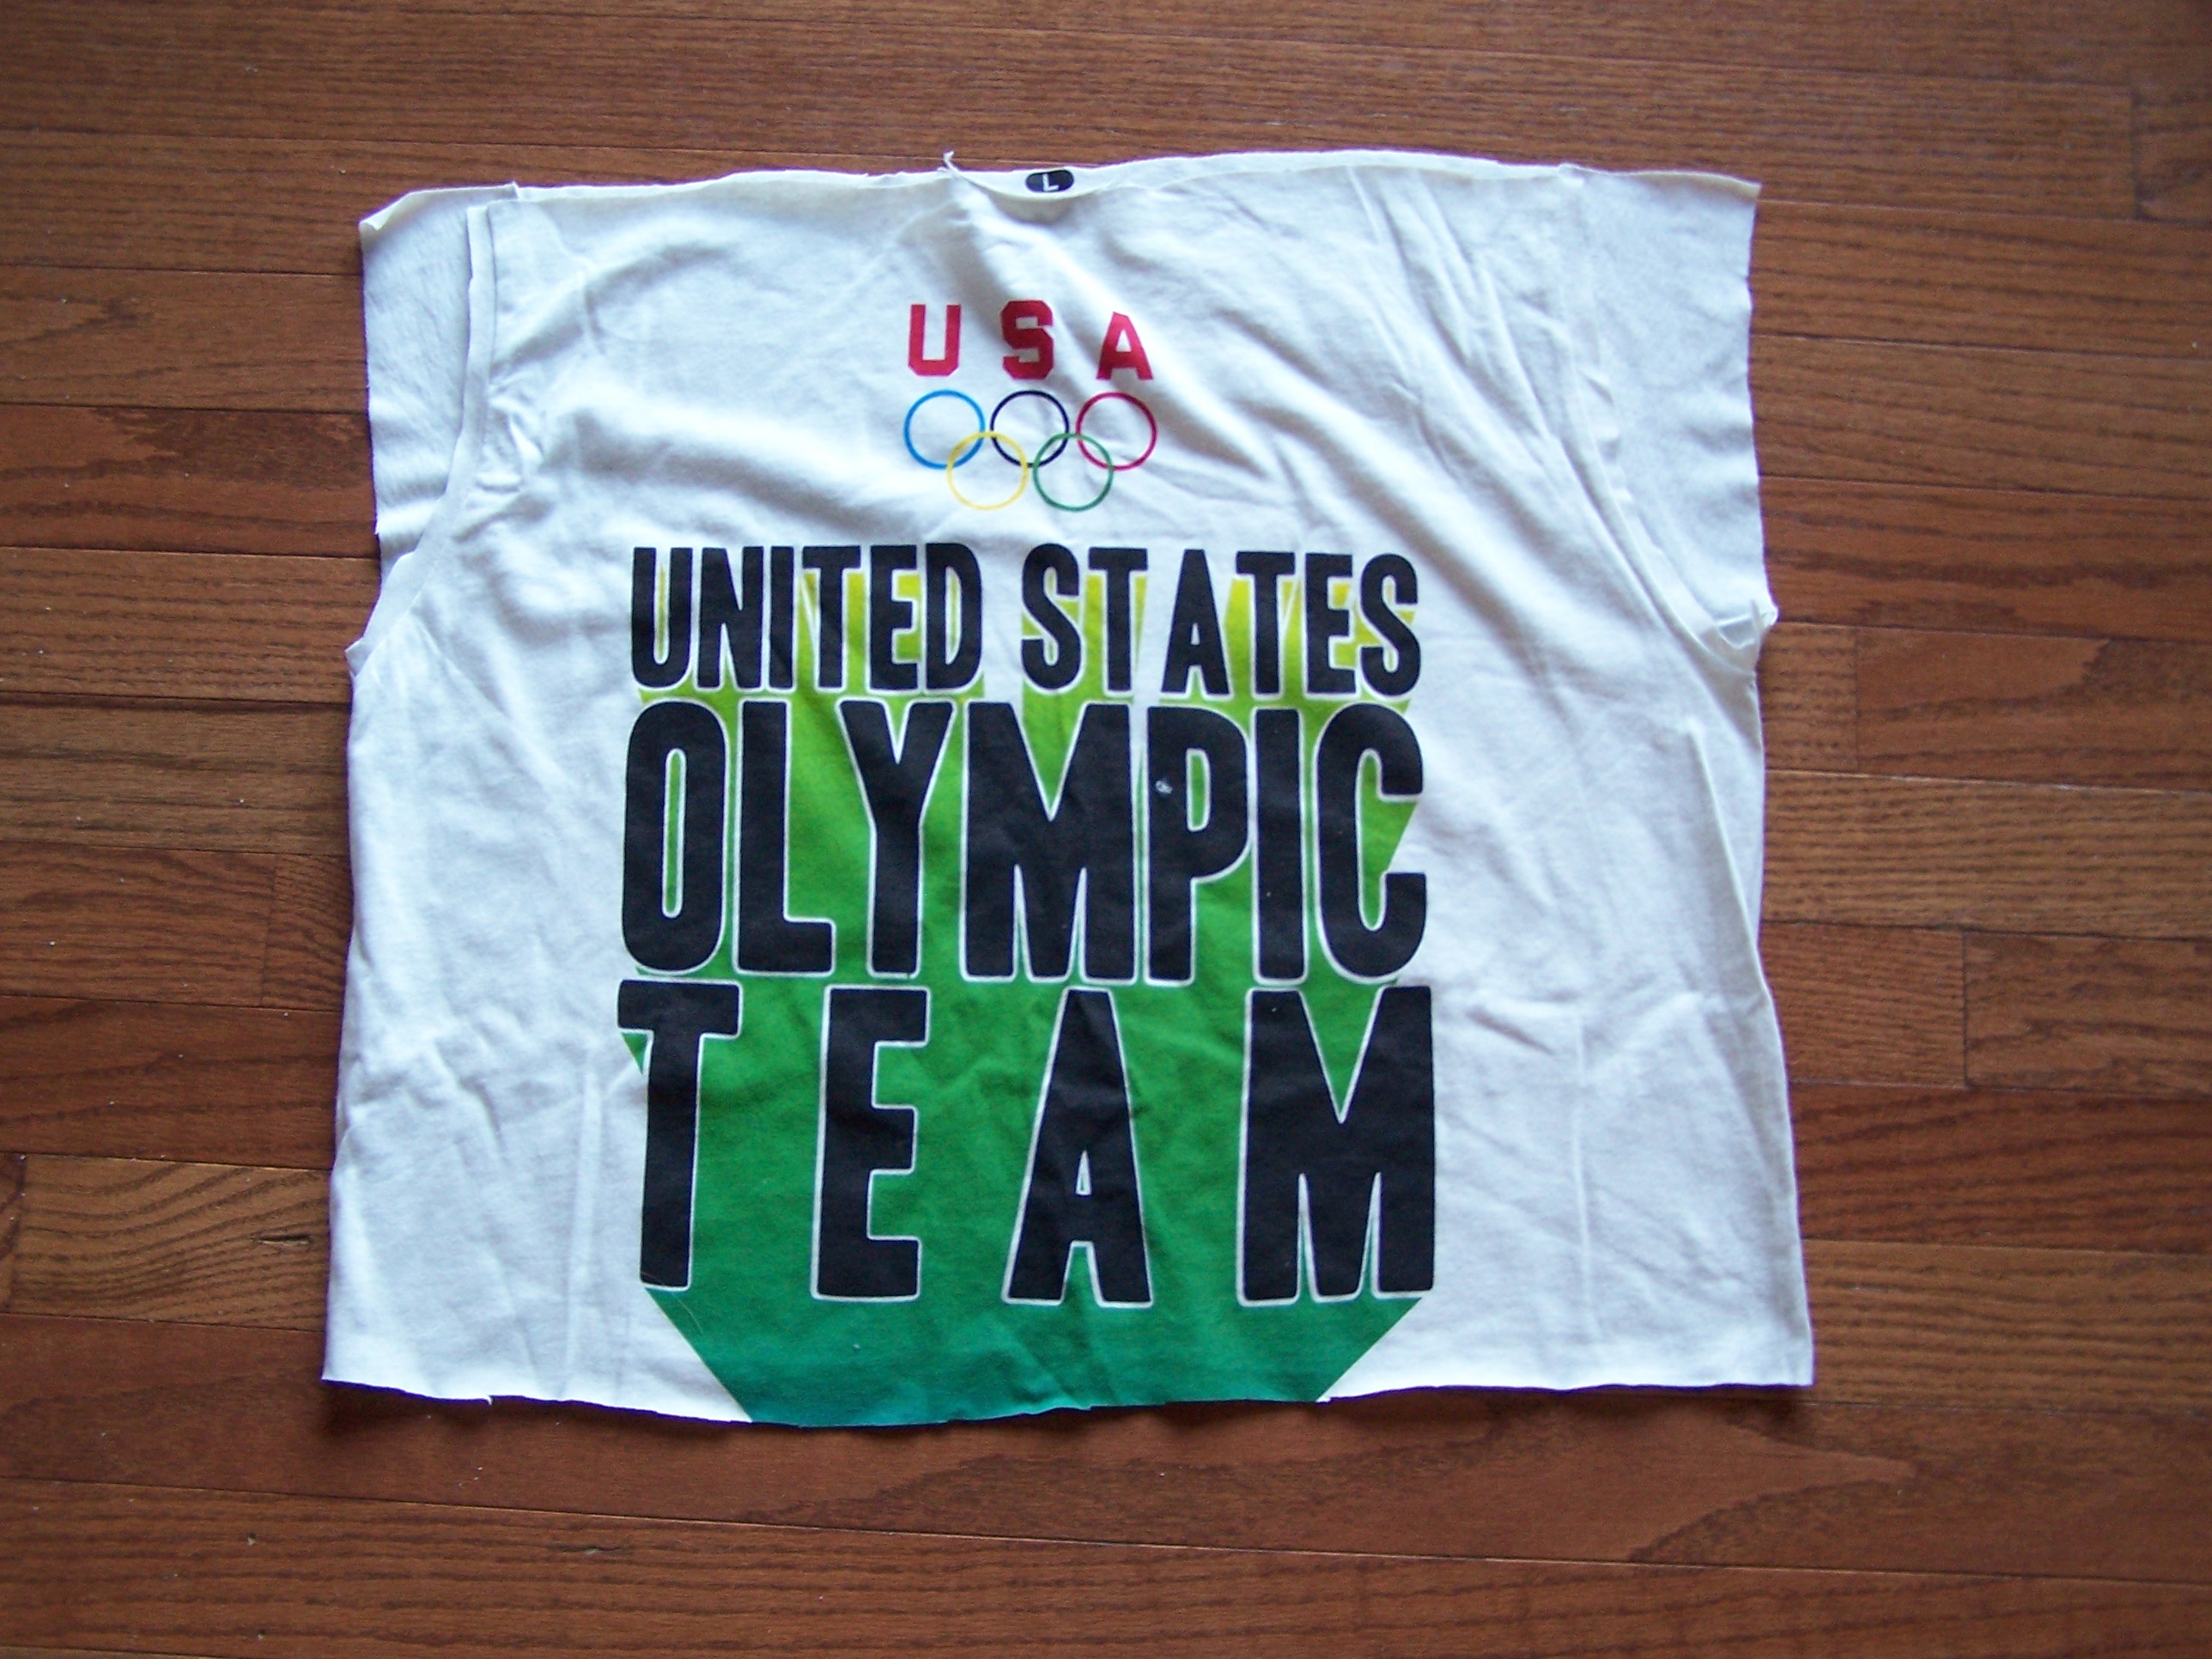
Shirt to Skirt Tutorial: The Fourth and Final Olympic Tee

The second off-white olympic tee is in for a completely different use... and I think it's my favorite! We're going to cut, sew, and add a little embellishment to turn a so-so top into a cute bottom (and we all want a cute bottom).

1.) Cut the Sleeves off keeping it in alignment with the sides of the shirt.

2.) Cut the shoulders to form a straight line at the top.

3.) Cut the bottom to the length you want your skirt, plus an inch (add more if you will be making a casing for your elastic).


4.) We're going to make some easy (What? Yes, I said easy!) pockets using the front half of the sleeves. Cut only the front portion of the sleeves about an inch from the curved seam, then fold inward and stitch down.


5.) On the piece you cut from the bottom, cut in half at the sides. You will use one piece to make your pockets.


I'm not entirely sure which is best... sewing the piece on now, or after you embellish. Here's what I did:

6.) Sew one piece to the pocket-front, stitching across the top/waist.


7.) Flip the piece to the inside of the skirt and stitch across the bottom edge, and then down the center. Easy pockets!


8.) Sew the open side seams together-Right-Sides together, of course.

9.) Now for the fun part... embellishing! Using some coordinating lace or trim, make patches to cover the silk-screening.


The Black Lace I was planning on using was a little too see-through. So I cut patches from leftover pieces, to go with the lace.


10.) When you are satisfied with your arrangement, sew your patches in place.

*** This is where I am torn about making the pockets prior to embellishing. If I waited to make the pockets I would have had the straight stitching lines running through the patches. However, since I made the pockets first, I had to arrange the patches so as not to sew the pockets shut.

If you opt to embellish first, at this point you would sew in your pocket panel using steps 6 and 7.


11.) Hem the Waist and Bottom edge of your skirt, and add your elastic. I chose to use the shirring technique as I did in the second Blue and Black Skiing shirt.


There you have it. A really simple skirt with pockets.