Another project for my Pay it Forward 2011. I love the beautiful Faux Stained Glass Wall Hangings I've seen. My mother has made some beautiful ones the "right" way with the black bias tape leading and everything.
For my first attempt, I thought I would try a pot holder size and I knew just the picture I wanted.
Luckily, I found this great instructional video from Details By Diane. She make is to easy!
1.) So. First things first. I found a free stained glass pattern online (if you would like to make a regular size wall hanging Diane sells patterns on her website). Then I traced my pieces onto the fusible backing.
2.) I cut out the pieces and ironed them onto the fabric. **Hint: If you trace the pieces that will be the same color all in one group you can save time by cutting around the whole group instead of the individual pieces.
3.) Arrange the pieces on the Black Background.
4.) When everything is where it should be peel off the backing paper and iron them down.
5.) For this particular pattern, I cut around the circle and cut a back fabric and batting. I also made a small tube for a hanging loop.
6.) Pin the layers as follows: Batting, then Backing Right-Side Up, then the Stained Glass piece Right-Side Down. Curve the tube and tuck it in between the backing fabric and the stained glass piece, matching the edges.
7.) Stitch around the edge leaving an opening for turning.
8.) Turn right-side out and press.
I know just who I will give this to! It's so fun and easy, you really should make one for yourself.
Showing posts with label decor. Show all posts
Friday, February 11, 2011
Wednesday, November 24, 2010
More Fun For Multicolor Corn
I've really loved the last couple of crafts using the pretty corn kernels, and am still thinking of a use for the millions of kernels I have left. Here are some pictures of other crafts for thought starters.
How about a wreath? I found this blog from Peach and Pearl, with lots of wreaths using natural elements. Something like the nut wreath in corn would look nice.
Or why not make a table top decor item by glueing them to a styrofoam cone (with other embellishments of course)?
Lining the bottom of a glass candle container with kernels instead of pebbles would be pretty, too.
Got any ideas? Please share, and have a Happy Thanksgiving!
How about a wreath? I found this blog from Peach and Pearl, with lots of wreaths using natural elements. Something like the nut wreath in corn would look nice.
Or why not make a table top decor item by glueing them to a styrofoam cone (with other embellishments of course)?
Lining the bottom of a glass candle container with kernels instead of pebbles would be pretty, too.
Got any ideas? Please share, and have a Happy Thanksgiving!
Labels:
corn crafts,
decor,
earthy,
easy,
Holidays,
Thanksgiving
Monday, November 8, 2010
Straight up Slippin', Boo! Using a Bed Sheet for a Slipcover
I'm so close to having my own creative space! The walls are up and painted a cheery yellow. Next we put in the drop ceiling and carpet. Woo hoo!
Something I will need after all the construction stuff is complete, is lovely furniture. I've already begun painting old cabinets...

... My project yesterday involved a cute little arm-chair. Just the thing for relaxing!
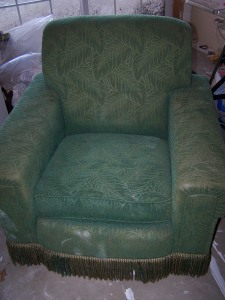
What? You don't think it's so cute? You don't see it working with cheery yellow walls?
Neither do I.
So I took myself over to Joann's and priced out the upholstery fabric for recovering (which happens to be 50% off this week).
Yeah...not gonna happen on my budget. I have expensive tastes.
Fortunately my quilting experience has taught me, a great way to get lots of fabric very cheaply is to buy a sheet. I got a full size set at a super store for right around $20, less than half of the price of the material at Joann's.
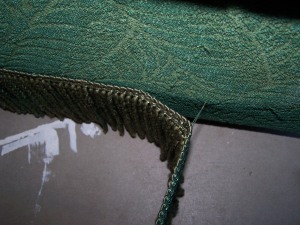
First thing I did was to take that horrible trim from the bottom.
Borrowing an idea from the now defunct Trading Spaces, I removed the cushion and draped the flat sheet over my chair and got to pinning.

1.) After draping the sheet (wrong-side up) over the chair, adjust (but not tuck) so that the bottom edge is even all the way around.
2.) Pin in the places where there is just too much fabric, corners, curves, etc. to fit the sheet to your chair's shape. Spend a lot of time on this step. The more pins and time, the easier it will be to sew and the better it will look.
***For a No-Sew Slipcover, use a bunch of safety-pin to fit the sheet.***


3.) Gently pull the sheet off of the chair, turn right-side up and place back on the chair to check the fit. You will likely do this step at least twice, just remember the more time you spend here the better it will look.
*** No-Sew: after this step you're done! Just pull a pillow case over the seat cushion and you're good to go.***

4.) Once you have it just how you want it, cut the excess fabric about half an inch away from the pins.
5.) Sew the, now cut, seams. (This is where I added a little trim)

6.) The seat cushion is as simple as making pillows. Measure the top square (or rectangle in my case) from side to side, and add an inch to each measurement. Cut two squares, that size. for the gusset (the strip that goes around the width) do the same, adding that inch to the width and length.
7.) Sew that all together, leaving the back open at one seam so you can slip the cushion in there.
8.) Finishing the edge for the cushion cover has a few options. You can hand stitch it closed, use hook and loop (like Velcro) pieces, or if you're lazy like me and out of velcro you can safety-pin it shut.
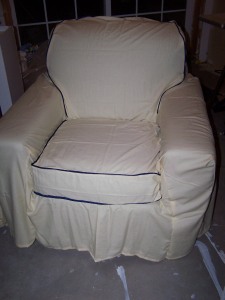
I can't wait to post some finished room pictures!
Something I will need after all the construction stuff is complete, is lovely furniture. I've already begun painting old cabinets...

... My project yesterday involved a cute little arm-chair. Just the thing for relaxing!

What? You don't think it's so cute? You don't see it working with cheery yellow walls?
Neither do I.
So I took myself over to Joann's and priced out the upholstery fabric for recovering (which happens to be 50% off this week).
Yeah...not gonna happen on my budget. I have expensive tastes.
Fortunately my quilting experience has taught me, a great way to get lots of fabric very cheaply is to buy a sheet. I got a full size set at a super store for right around $20, less than half of the price of the material at Joann's.
First thing I did was to take that horrible trim from the bottom.

Borrowing an idea from the now defunct Trading Spaces, I removed the cushion and draped the flat sheet over my chair and got to pinning.

1.) After draping the sheet (wrong-side up) over the chair, adjust (but not tuck) so that the bottom edge is even all the way around.
2.) Pin in the places where there is just too much fabric, corners, curves, etc. to fit the sheet to your chair's shape. Spend a lot of time on this step. The more pins and time, the easier it will be to sew and the better it will look.
***For a No-Sew Slipcover, use a bunch of safety-pin to fit the sheet.***


3.) Gently pull the sheet off of the chair, turn right-side up and place back on the chair to check the fit. You will likely do this step at least twice, just remember the more time you spend here the better it will look.
*** No-Sew: after this step you're done! Just pull a pillow case over the seat cushion and you're good to go.***

4.) Once you have it just how you want it, cut the excess fabric about half an inch away from the pins.
5.) Sew the, now cut, seams. (This is where I added a little trim)

6.) The seat cushion is as simple as making pillows. Measure the top square (or rectangle in my case) from side to side, and add an inch to each measurement. Cut two squares, that size. for the gusset (the strip that goes around the width) do the same, adding that inch to the width and length.
7.) Sew that all together, leaving the back open at one seam so you can slip the cushion in there.
8.) Finishing the edge for the cushion cover has a few options. You can hand stitch it closed, use hook and loop (like Velcro) pieces, or if you're lazy like me and out of velcro you can safety-pin it shut.

I can't wait to post some finished room pictures!
Labels:
Chair,
cheap,
decor,
decorating on a budget,
easy,
inexpensive,
no-sew,
quick,
Re-Purposing,
recycling,
repurpose,
sewing,
Slipcover,
T-shirt,
Tutorial,
upcycle,
Upcycling
Wednesday, October 27, 2010
A Sweet Little Pin Cushion-No Sew
Today, I had a nagging pain in my neck and head. Today, I had dishes and laundry piled up. Today, the laundry just isn't getting done. Today, I needed a simple craft. Something quick and pretty, with almost instant gratification.Today...I stumbled upon the sweet little pin cushion tutorial from Creations By Kara. Perfect!
I gathered my supplies...
Tuna Can, and coordinating Fabrics

Cut a strip and a circle...

I gathered and stuffed...

I glued...

And glued some more, then embellished...

Ahhhhhhhhh. I have crafted. My laundry is still there, but I feel my day is complete.
Do me a favor and check out Kara's tutorial. She did a great job, and so will you!
I gathered my supplies...
Tuna Can, and coordinating Fabrics

Cut a strip and a circle...

I gathered and stuffed...

I glued...

And glued some more, then embellished...

Ahhhhhhhhh. I have crafted. My laundry is still there, but I feel my day is complete.
Do me a favor and check out Kara's tutorial. She did a great job, and so will you!
Labels:
Accessories,
cheap,
decor,
easy,
inexpensive,
kid friendly,
no-sew,
Re-Purposing,
repurpose,
scrap,
stash buster,
Tutorial,
upcycle,
Upcycling
Tuesday, October 26, 2010
Nifty-Gifty: A Quick Little Basket with Sew or No-Sew Instructions
This sweet little recycling piece is actually a project I did in Summer Camp around the age of ten (in a group of 9-12 yr olds), using hot glue guns instead of sewing machines. It makes use of an old plastic bottle and fabric scraps; it's a great fat quarter/scrap project; AND it makes a perfect little gift basket for smaller items.
You Will Need:

1.) Cut 2 circles from your fabric. I used a 13 inch pot-lid to trace them out, but I found it was just a little smaller than I wanted. I suggest a circle with a 15 inch diameter.

As you can see I chose 2 coordinating fabrics

2.) I find it easier to work with if I sew the trim to the right side of one circle...

3.) ...then sew the second circle to the first one (right-sides together), sandwiching the trim between the two pieces. Leave a few inches unsewn and turn right-side out. (P.S. If you don't have a piping foot, a zipper foot is very helpful)

*************************************************************************************
No-Sew Instructions:
1.)Iron a quarter-inch fold, towards the back, around the edges of both circles.
2.) Hot glue the trim to the back (wrong side) of one circle
3.) Then glue the second circle wrong-sides together to the trim, leaving a portion of the edge open to stuff.
************************************************************************************
4.) Stuff lightly.

5.) Cut the bottom off of the soda bottle about 4 or 5 inches up. The bottom will be your basket.

6.) Cut a strip of fabric long enough to cover the circumference of the bottle, and 8 inches wide. Hot glue this piece to the outside of the bottle, then fold to the inside of the bottle and glue down.


7.) Place the bottle on the center of the stuffed circle. Gather the circle upward and secure with the rubber band.


8.) Cover the rubber band with a ribbon.

9.) Fill with whatever goodies you like: flowers; candy; potpourri; tea and crackers; soup mix; etc. Wouldn't this be a great gift basket or craft/party favor?

I filled mine with the lovely Coffee Filter Flowers I made (yes, I said those flowers were MADE) from Aunt Peaches' Blog.
You Will Need:
- A Plastic Bottle (2-Liter soda bottles work well)
- Fabric
- Trim
- Glue Gun
- Rubber band
- Ribbon
- Stuffing

1.) Cut 2 circles from your fabric. I used a 13 inch pot-lid to trace them out, but I found it was just a little smaller than I wanted. I suggest a circle with a 15 inch diameter.

As you can see I chose 2 coordinating fabrics

2.) I find it easier to work with if I sew the trim to the right side of one circle...

3.) ...then sew the second circle to the first one (right-sides together), sandwiching the trim between the two pieces. Leave a few inches unsewn and turn right-side out. (P.S. If you don't have a piping foot, a zipper foot is very helpful)

*************************************************************************************
No-Sew Instructions:
1.)Iron a quarter-inch fold, towards the back, around the edges of both circles.
2.) Hot glue the trim to the back (wrong side) of one circle
3.) Then glue the second circle wrong-sides together to the trim, leaving a portion of the edge open to stuff.
************************************************************************************
4.) Stuff lightly.

5.) Cut the bottom off of the soda bottle about 4 or 5 inches up. The bottom will be your basket.

6.) Cut a strip of fabric long enough to cover the circumference of the bottle, and 8 inches wide. Hot glue this piece to the outside of the bottle, then fold to the inside of the bottle and glue down.


7.) Place the bottle on the center of the stuffed circle. Gather the circle upward and secure with the rubber band.


8.) Cover the rubber band with a ribbon.

9.) Fill with whatever goodies you like: flowers; candy; potpourri; tea and crackers; soup mix; etc. Wouldn't this be a great gift basket or craft/party favor?

I filled mine with the lovely Coffee Filter Flowers I made (yes, I said those flowers were MADE) from Aunt Peaches' Blog.
Tuesday, October 5, 2010
Mom & Kid Friendly Craft: Pumpkin Stack
On a recent visit to Target, I was browsing the Dollar Aisle (my favorite aisle) when I found this cute little fall decor item:
[caption id="attachment_47" align="aligncenter" width="224" caption="Sorry about the picture quality. I couldn't find a good one online."]
[/caption]
Now, I could have bought this for $2. But why buy it when I already have everything I need to make it at home? So I snapped a quick picture using my phone.
To make this cutie you will need:
**This may seem like a long list, but as I said, most crafters will have these things already. If you do not, a quick trip to your local craft store will supply what you need.
1.) On the back (wrong side) of your fabric trace two circles using a dinner plate and a smaller/bread plate. You should have a big circle and a slightly smaller circle. I was given some fabric swatches from a furniture store, so I will be using one of those.
[caption id="attachment_48" align="aligncenter" width="300" caption="If you should be able to trace both circles on one piece of fabric."]
[/caption]
2.) Cut out your Circles.

3.) Using the thread or floss, sew a loose gathering stitch near the edge, all the way around the largest circle.

4.) Pull the thread to gather the edge together, leaving enough room to place some stuffing inside.

5.) Pull the thread to gather it tight, leaving an opening about two finger's width (one finger's width for the small circle). Secure it with a couple more stitches and a knot. Finish stuffing, you want it to be somewhat firm.

Repeat steps 1-5 for the small circle, and you will have this:

Now to assemble your Pumpkin Stack.
1.) Place hot glue on the end of your stem piece (sticks look wonderfully natural) and place in the top hole of the smaller pumpkin, into the stuffing.

2.) Place hot glue around the opening of the larger pumpkin, and place smaller pumpkin on top.


3.) Finish off the top with Raffia, Ribbon, or whatever your little heart desires.

My boys, ranging in age from 4-10 all loved making this. I just had to do the sewing and gluing for the 4 yr. old. If you make one of your own, I'd love to see it!
Linked On:

[caption id="attachment_47" align="aligncenter" width="224" caption="Sorry about the picture quality. I couldn't find a good one online."]
[/caption]Now, I could have bought this for $2. But why buy it when I already have everything I need to make it at home? So I snapped a quick picture using my phone.
To make this cutie you will need:
- A scrap of fabric 14.5 in. X 17 in
- Dinner Plate
- Small (bread) Plate
- Strong Thread or Embroidery Floss
- Needle
- Stuffing
- Something for a Stem (I just picked up a stick in my backyard)
- Hot Glue Gun
- Trim Pieces (ribbon, raffia, etc)
**This may seem like a long list, but as I said, most crafters will have these things already. If you do not, a quick trip to your local craft store will supply what you need.
1.) On the back (wrong side) of your fabric trace two circles using a dinner plate and a smaller/bread plate. You should have a big circle and a slightly smaller circle. I was given some fabric swatches from a furniture store, so I will be using one of those.
[caption id="attachment_48" align="aligncenter" width="300" caption="If you should be able to trace both circles on one piece of fabric."]
[/caption]2.) Cut out your Circles.

3.) Using the thread or floss, sew a loose gathering stitch near the edge, all the way around the largest circle.

4.) Pull the thread to gather the edge together, leaving enough room to place some stuffing inside.

5.) Pull the thread to gather it tight, leaving an opening about two finger's width (one finger's width for the small circle). Secure it with a couple more stitches and a knot. Finish stuffing, you want it to be somewhat firm.

Repeat steps 1-5 for the small circle, and you will have this:

Now to assemble your Pumpkin Stack.
1.) Place hot glue on the end of your stem piece (sticks look wonderfully natural) and place in the top hole of the smaller pumpkin, into the stuffing.

2.) Place hot glue around the opening of the larger pumpkin, and place smaller pumpkin on top.


3.) Finish off the top with Raffia, Ribbon, or whatever your little heart desires.

My boys, ranging in age from 4-10 all loved making this. I just had to do the sewing and gluing for the 4 yr. old. If you make one of your own, I'd love to see it!
Linked On:

Subscribe to:
Posts (Atom)


